原创 / 朱季谦
在 Spring Security 权限框架里,若要对后端 http 接口实现权限授权控制,有两种实现方式。
一、一种是基于注解方法级的鉴权,其中,注解方式又有 @Secured 和 @PreAuthorize 两种。
@Secured 如:
1 @PostMapping("/test")
2 @Secured({WebResRole.ROLE_PEOPLE_W})
3 public void test(){
4 ......
5 return null;
6 }
@PreAuthorize 如:
1 @PostMapping("save")
2 @PreAuthorize("hasAuthority('sys:user:add') AND hasAuthority('sys:user:edit')")
3 public RestResponse save(@RequestBody @Validated SysUser sysUser, BindingResult result) {
4 ValiParamUtils.ValiParamReq(result);
5 return sysUserService.save(sysUser);
6 }
二、一种基于 config 配置类,需在对应 config 类配置 @EnableGlobalMethodSecurity(prePostEnabled = true) 注解才能生效,其权限控制方式如下:
1 @Override
2 protected void configure(HttpSecurity httpSecurity) throws Exception {
3
4 httpSecurity.cors().and().csrf().disable()
5
6 .authorizeRequests()
7
8 .antMatchers("/").permitAll()
9 .antMatchers("/login").permitAll()
10
11 .anyRequest().authenticated();
12
13 httpSecurity.logout().logoutSuccessHandler(...);
14
15 httpSecurity.addFilterBefore(...);
16 }
这两种方式各有各的特点,在日常开发当中,普通程序员接触比较多的,则是注解方式的接口权限控制。
那么问题来了,我们配置这些注解或者类,其 security 框是如何帮做到能针对具体的后端 API 接口做权限控制的呢?
单从一行 @PreAuthorize("hasAuthority('sys:user:add') AND hasAuthority('sys:user:edit')") 注解上看,是看不出任何头绪来的,若要回答这个问题,还需深入到源码层面,方能对 security 授权机制有更好理解。
若要对这个过程做一个总的概述,笔者整体以自己的思考稍作了总结,可以简单几句话说明其整体实现,以该接口为例:
1 @PostMapping("save")
2 @PreAuthorize("hasAuthority('sys:user:add')")
3 public RestResponse save(@RequestBody @Validated SysUser sysUser, BindingResult result) {
4 ValiParamUtils.ValiParamReq(result);
5 return sysUserService.save(sysUser);
6 }
即,认证通过的用户,发起请求要访问“/save”接口,若该 url 请求在配置类里设置为必须进行权限认证的,就会被 security 框架使用 filter 拦截器对该请求进行拦截认证。拦截过程主要一个动作,是把该请求所拥有的权限集与 @PreAuthorize 设置的权限字符“sys:user:add”进行匹配,若能匹配上,说明该请求是拥有调用“/save”接口的权限,那么,就可以被允许执行该接口资源。
在 springboot+security+jwt 框架中,通过一系列内置或者自行定义的过滤器 Filter 来达到权限控制,如何设置自定义的过滤器 Filter 呢?例如,可以通过设置 httpSecurity.addFilterBefore(new JwtFilter(authenticationManager()), UsernamePasswordAuthenticationFilter.class) 来自定义一个基于 JWT 拦截的过滤器 JwtFilter,这里的 addFilterBefore 方法将在下一篇文详细分析,这里暂不展开,该方法大概意思就是,将自定义过滤器 JwtFilter 加入到 Security 框架里,成为其中的一个优先安全 Filter,代码层面就是将自定义过滤器添加到 Listfilters。
设置增加自行定义的过滤器 Filter 伪代码如下:
1 @Configuration
2 @EnableWebSecurity
3 @EnableGlobalMethodSecurity(prePostEnabled = true)
4 public class SecurityConfig extends WebSecurityConfigurerAdapter {
5 ......
6 @Override
7 protected void configure(HttpSecurity httpSecurity) throws Exception {
8
9 httpSecurity.cors().and().csrf().disable()
10
11 .authorizeRequests()
12 ......
13
14 .antMatchers("/").permitAll()
15 .antMatchers("/login").permitAll()
16
17 .anyRequest().authenticated();
18 ......
19
20 httpSecurity.addFilterBefore(new JwtFilter(authenticationManager()), UsernamePasswordAuthenticationFilter.class);
21 }
22 }
该过滤器类 extrends 继承 BasicAuthenticationFilter,而 BasicAuthenticationFilter 是继承 OncePerRequestFilter,该过滤器确保在一次请求只通过一次 filter,而不需要重复执行。这样配置后,当请求过来时,会自动被 JwtFilter 类拦截,这时,将执行重写的 doFilterInternal 方法,在 SecurityContextHolder.getContext().setAuthentication(authentication) 认证通过后,会执行过滤器链 FilterChain 的方法 chain.doFilter(request, response);
1 public class JwtFilter extends BasicAuthenticationFilter {
2
3 @Autowired
4 public JwtFilter(AuthenticationManager authenticationManager) {
5 super(authenticationManager);
6 }
7
8 @Override
9 protected void doFilterInternal(HttpServletRequest request, HttpServletResponse response, FilterChain chain) throws IOException, ServletException {
10
11
12 Authentication authentication = JwtTokenUtils.getAuthenticationeFromToken(request);
13
14 SecurityContextHolder.getContext().setAuthentication(authentication);
15
16 chain.doFilter(request, response);
17 }
18
19 }
那么,问题来了,过滤器链 FilterChain 究竟是什么?
这里,先点进去看下其类源码:
1 package javax.servlet;
2
3 import java.io.IOException;
4
5 public interface FilterChain {
6 void doFilter(ServletRequest var1, ServletResponse var2) throws IOException, ServletException;
7 }
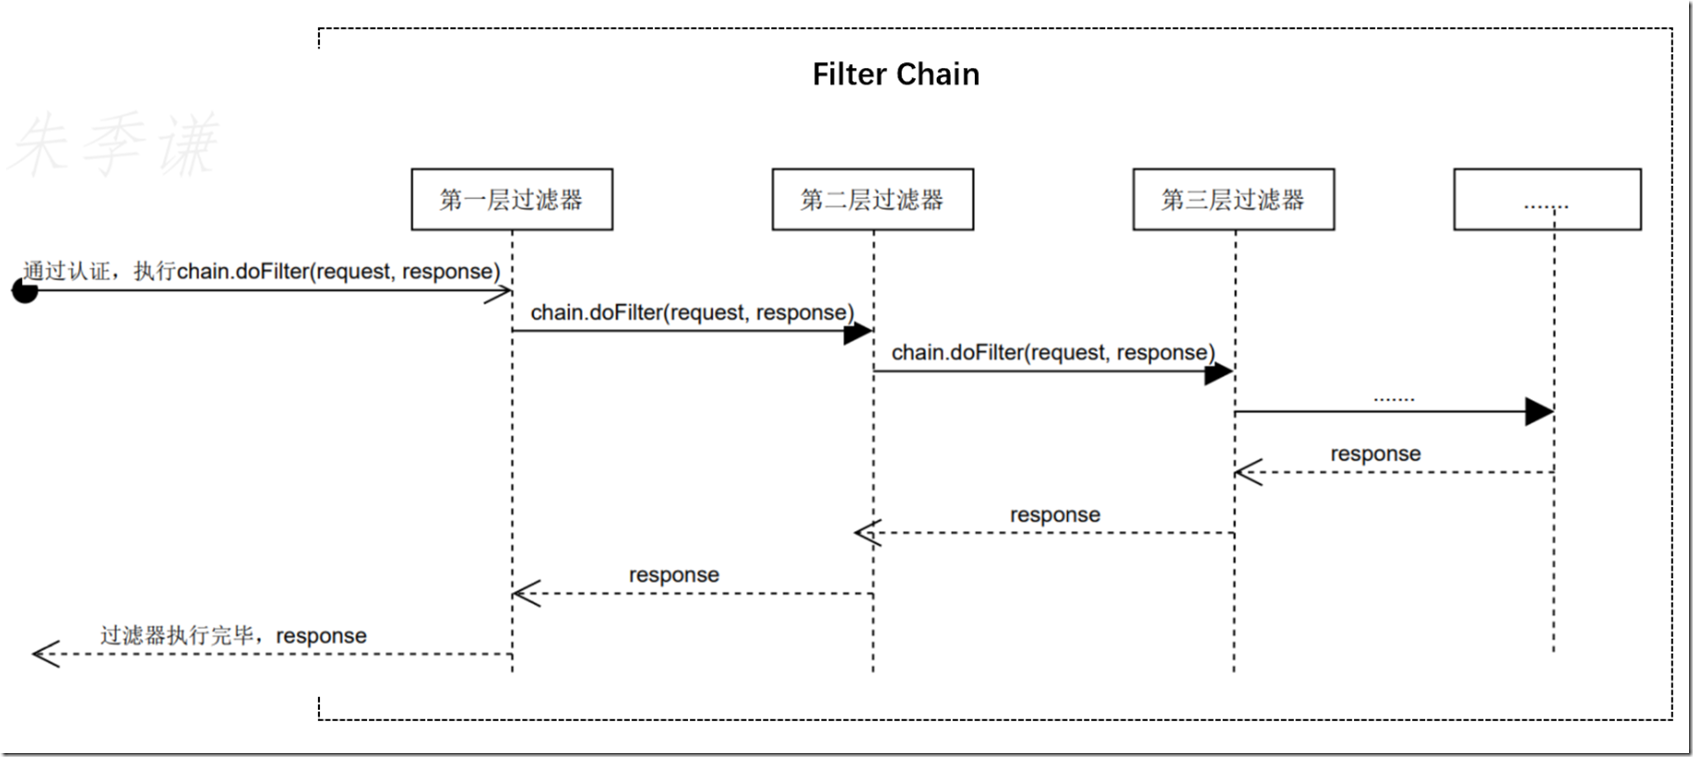
FilterChain 只有一个 doFilter 方法,这个方法的作用就是将请求 request 转发到下一个过滤器 filter 进行过滤处理操作,执行过程如下:
过滤器链像一条铁链,把相关的过滤器链接起来,请求线程如蚂蚁一样,会沿着这条链一直爬过去 ----- 即,通过 chain.doFilter(request, response) 方法,一层嵌套一层地传递下去,当传递到该请求对应的最后一个过滤器,就会将处理完成的请求转发返回。因此,通过过滤器链,可实现在不同的过滤器当中对请求 request 做处理,且过滤器之间彼此互不干扰。
这其实是一种责任链的设计模式。在这种模式当中,通常每个接受者都包含对另一个接收者的引用。如果一个对象不能处理该请求,那么,它就会把相同的请求传给下一个接收者,以此类推。
Spring Security 框架上过滤器链上都有哪些过滤器呢?
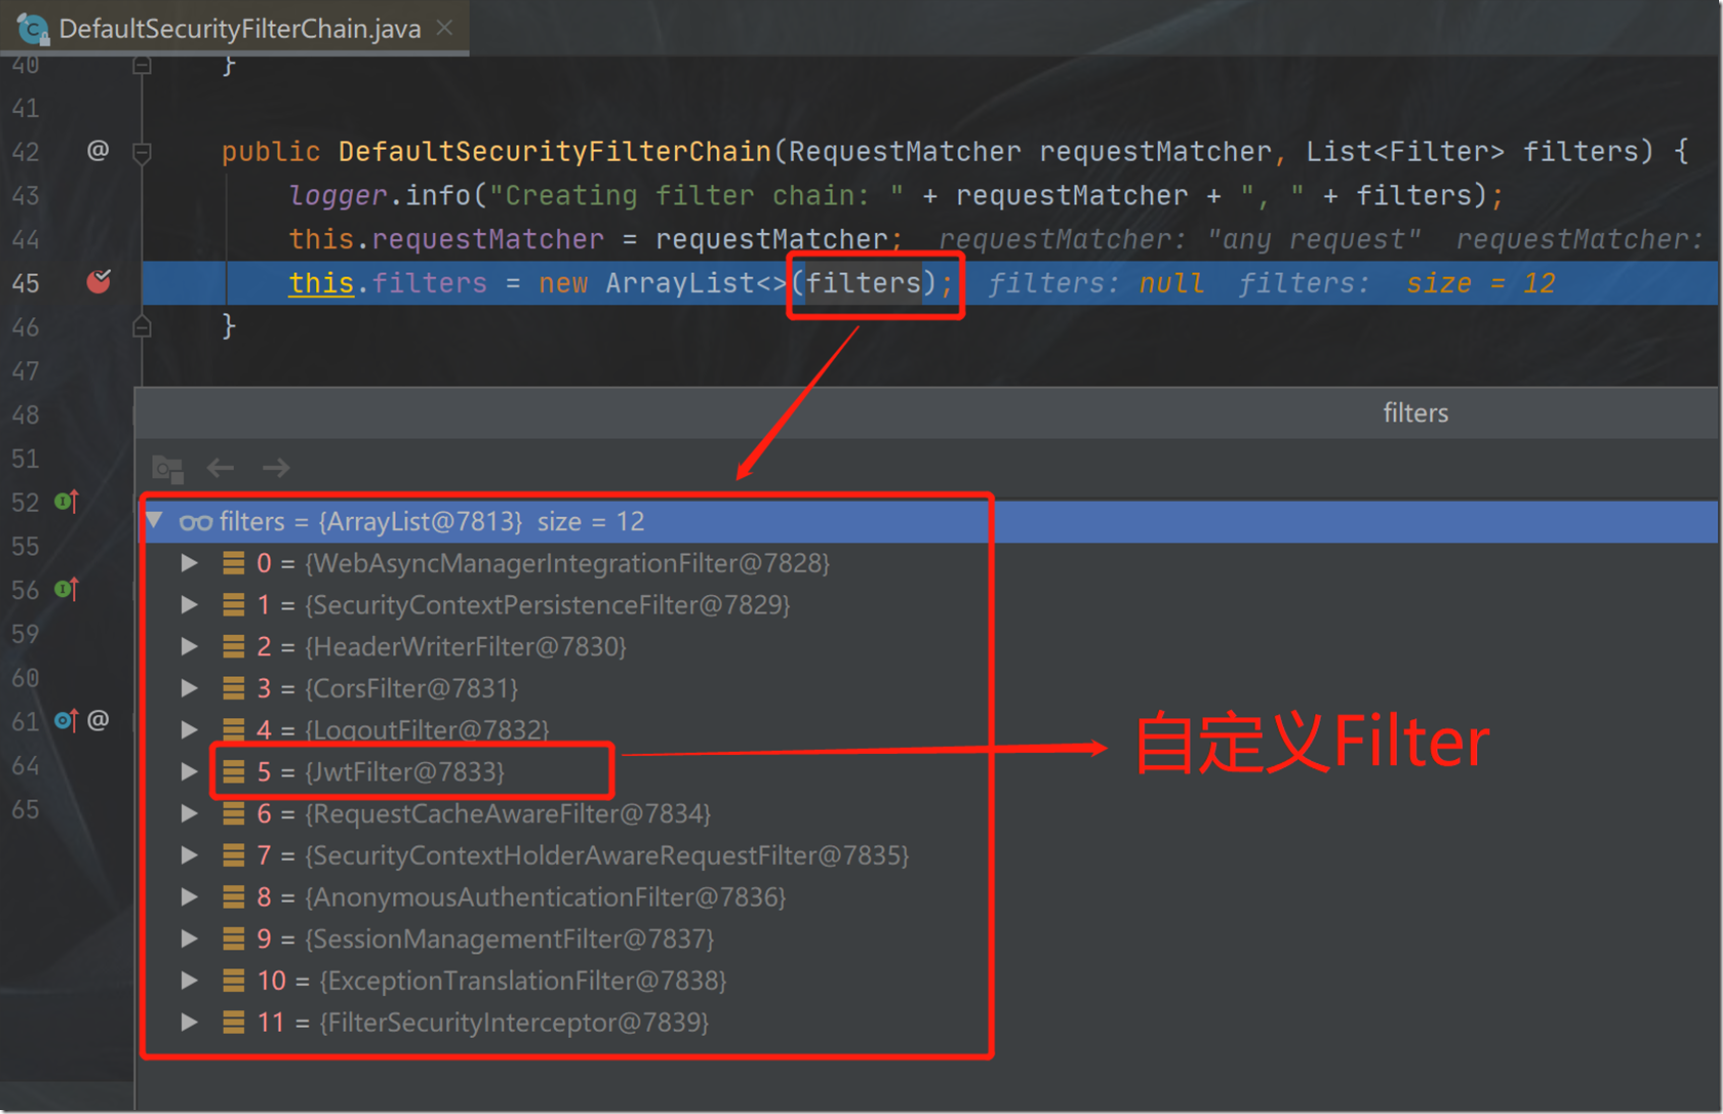
可以在 DefaultSecurityFilterChain 类根据输出相关 log 或者 debug 来查看 Security 都有哪些过滤器,如在 DefaultSecurityFilterChain 类中的构造器中打断点,如图所示,可以看到,自定义的 JwtFilter 过滤器也包含其中:
这些过滤器都在同一条过滤器链上,即通过 chain.doFilter(request, response) 可将请求一层接一层转发,处理请求接口是否授权的主要过滤器是 FilterSecurityInterceptor,其主要作用如下:
1. 获取到需访问接口的权限信息,即 @Secured({WebResRole.ROLE_PEOPLE_W}) 或 @PreAuthorize 定义的权限信息;
2. 根据 SecurityContextHolder 中存储的 authentication 用户信息,来判断是否包含与需访问接口的权限信息,若包含,则说明拥有该接口权限;
3. 主要授权功能在父类 AbstractSecurityInterceptor 中实现;
我们将从 FilterSecurityInterceptor 这里开始重点分析 Security 授权机制原理的实现。
过滤器链将请求传递转发 FilterSecurityInterceptor 时,会执行 FilterSecurityInterceptor 的 doFilter 方法:
1 public void doFilter(ServletRequest request, ServletResponse response,
2 FilterChain chain) throws IOException, ServletException {
3 FilterInvocation fi = new FilterInvocation(request, response, chain);
4 invoke(fi);
5 }
在这段代码当中,FilterInvocation 类是一个有意思的存在,其实它的功能很简单,就是将上一个过滤器传递过滤的 request,response,chain 复制保存到 FilterInvocation 里,专门供 FilterSecurityInterceptor 过滤器使用。它的有意思之处在于,是将多个参数统一归纳到一个类当中,其到统一管理作用,你想,若是 N 多个参数,传进来都分散到类的各个地方,参数多了,代码多了,方法过于分散时,可能就很容易造成阅读过程中,弄糊涂这些个参数都是哪里来了。但若统一归纳到一个类里,就能很快定位其来源,方便代码阅读。网上有人提到该 FilterInvocation 类还起到解耦作用,即避免与其他过滤器使用同样的引用变量。
总而言之,这个地方的设定虽简单,但很值得我们学习一番,将其思想运用到实际开发当中,不外乎也是一种能简化代码的方法。
FilterInvocation 主要源码如下:
1 public class FilterInvocation {
2
3 private FilterChain chain;
4 private HttpServletRequest request;
5 private HttpServletResponse response;
6
7
8 public FilterInvocation(ServletRequest request, ServletResponse response,
9 FilterChain chain) {
10 if ((request == null) || (response == null) || (chain == null)) {
11 throw new IllegalArgumentException("Cannot pass null values to constructor");
12 }
13
14 this.request = (HttpServletRequest) request;
15 this.response = (HttpServletResponse) response;
16 this.chain = chain;
17 }
18 ......
19 }
FilterSecurityInterceptor 的 doFilter 方法里调用 invoke(fi) 方法:
1 public void invoke(FilterInvocation fi) throws IOException, ServletException {
2 if ((fi.getRequest() != null)
3 && (fi.getRequest().getAttribute(FILTER_APPLIED) != null)
4 && observeOncePerRequest) {
5
6 fi.getChain().doFilter(fi.getRequest(), fi.getResponse());
7 }
8 else {
9
10 if (fi.getRequest() != null && observeOncePerRequest) {
11 fi.getRequest().setAttribute(FILTER_APPLIED, Boolean.TRUE);
12 }
13
14 InterceptorStatusToken token = super.beforeInvocation(fi);
15 try {
16
17 fi.getChain().doFilter(fi.getRequest(), fi.getResponse());
18 }
19 finally {
20 super.finallyInvocation(token);
21 }
22
23 super.afterInvocation(token, null);
24 }
25 }
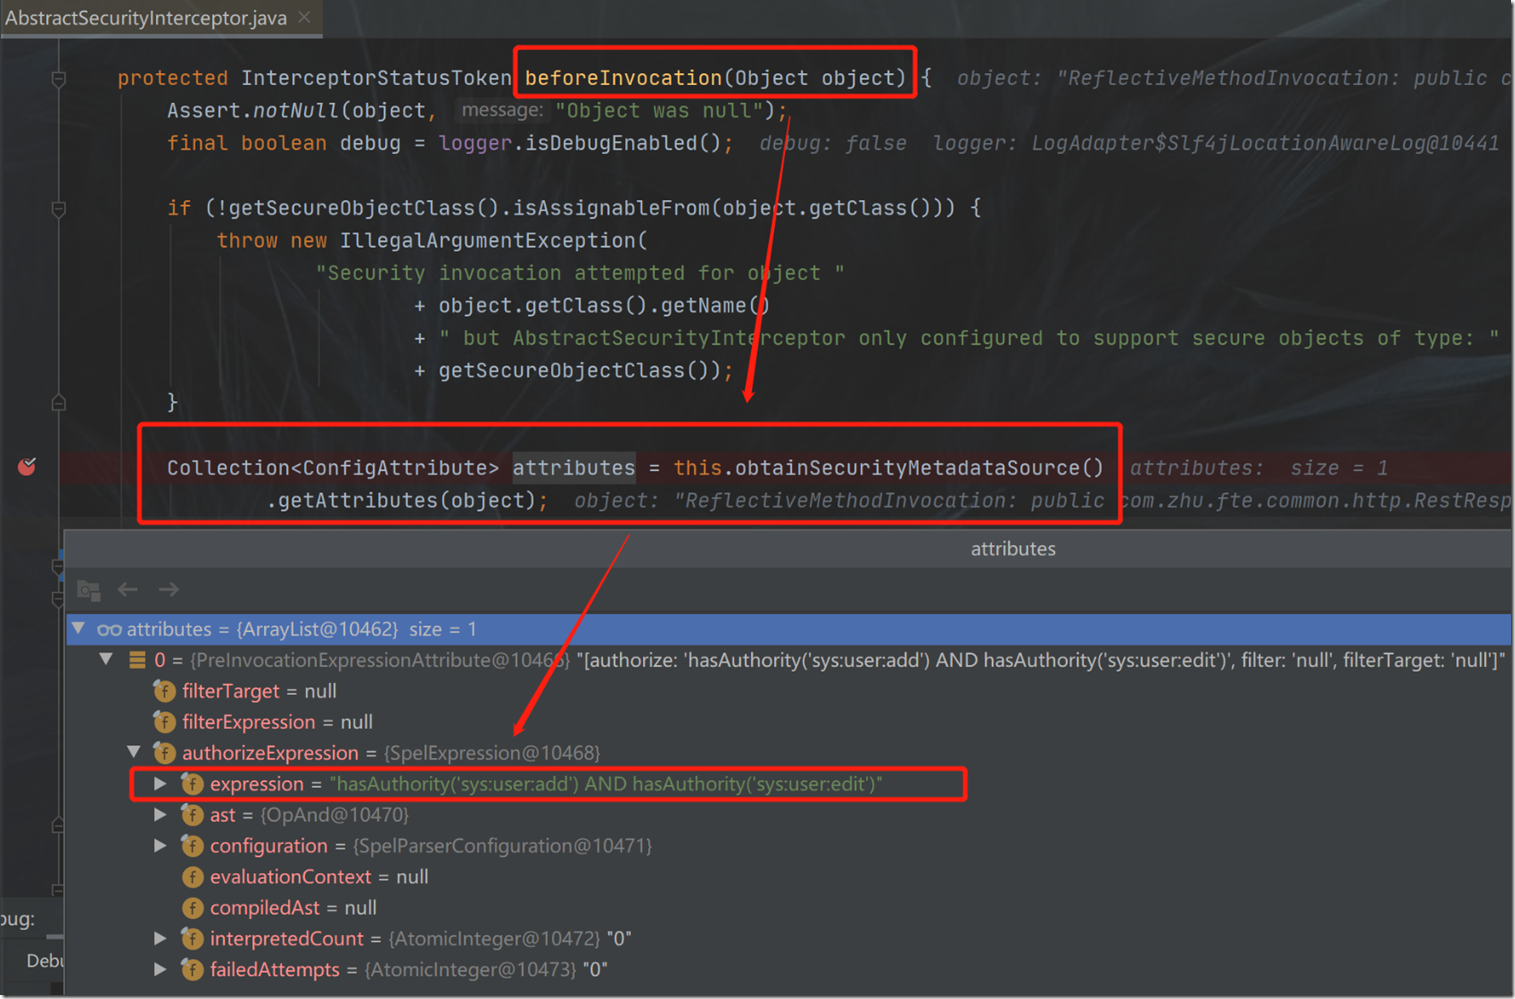
授权机制实现的入口是 super.beforeInvocation(fi),其具体实现在父类 AbstractSecurityInterceptor 中实现,beforeInvocation(Object object) 的实现主要包括以下步骤:
一、获取需访问的接口权限,这里 debug 的例子是调用了前文提到的“/save”接口,其权限设置是 @PreAuthorize("hasAuthority('sys:user:add') AND hasAuthority('sys:user:edit')"),根据下面截图,可知变量 attributes 获取了到该请求接口的权限:
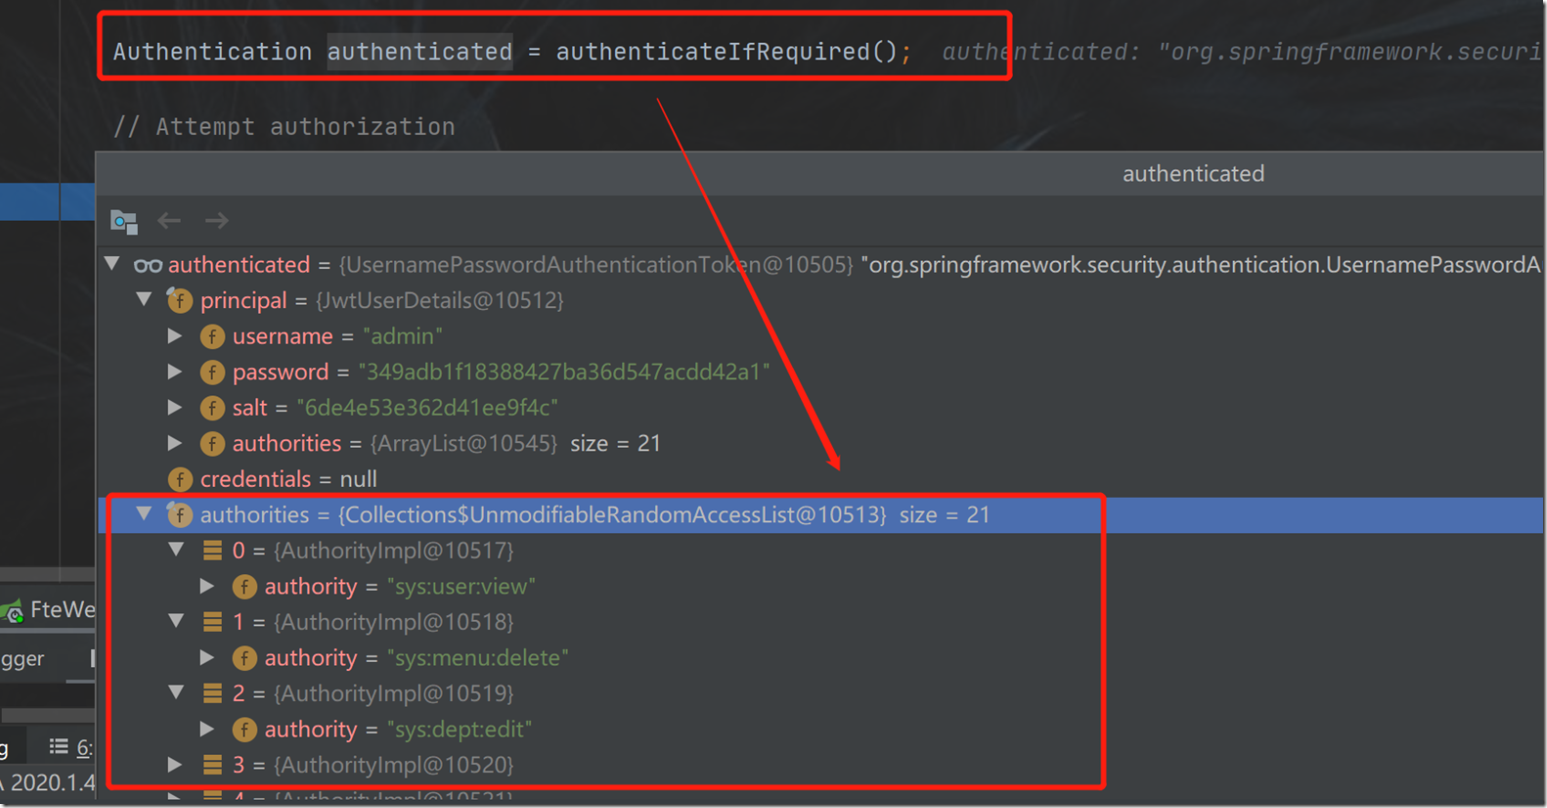
二、获取认证通过之后保存在 SecurityContextHolder 的用户信息,其中,authorities 是一个保存用户所拥有全部权限的集合;
这里 authenticateIfRequired() 方法核心实现:
1 private Authentication authenticateIfRequired() {
2 Authentication authentication = SecurityContextHolder.getContext()
3 .getAuthentication();
4 if (authentication.isAuthenticated() && !alwaysReauthenticate) {
5 ......
6 return authentication;
7 }
8 authentication = authenticationManager.authenticate(authentication);
9 SecurityContextHolder.getContext().setAuthentication(authentication);
10 return authentication;
11 }
在认证过程通过后,执行 SecurityContextHolder.getContext().setAuthentication(authentication) 将用户信息保存在 Security 框架当中,之后可通过 SecurityContextHolder.getContext().getAuthentication() 获取到保存的用户信息;
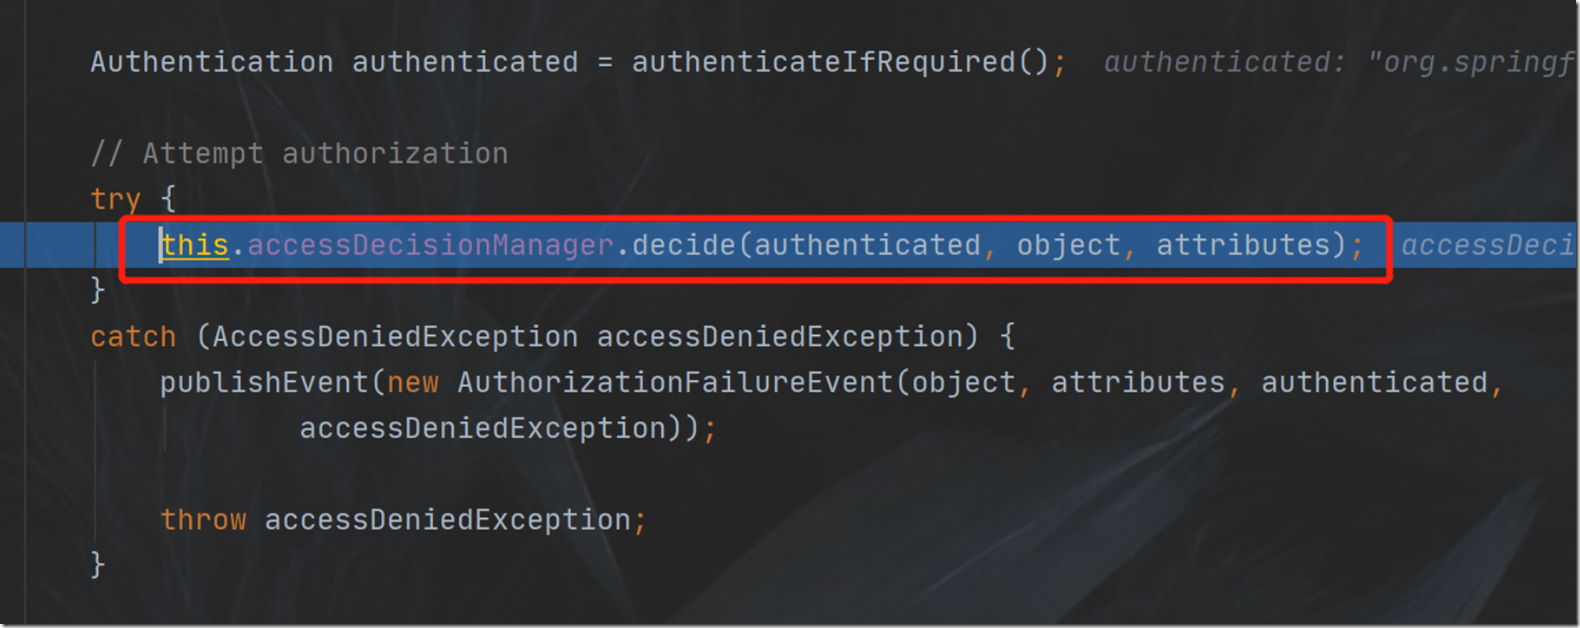
三、尝试授权,用户信息 authenticated、请求携带对象信息 object、所访问接口的权限信息 attributes,传入到 decide 方法;
decide() 是决策管理器 AccessDecisionManager 定义的一个方法。
1 public interface AccessDecisionManager {
2 void decide(Authentication authentication, Object object,
3 Collection<configattribute> configAttributes) throws AccessDeniedException,
4 InsufficientAuthenticationException;
5 boolean supports(ConfigAttribute attribute);
6 boolean supports(Class<!--?--> clazz);
7 }</configattribute>
AccessDecisionManager 是一个 interface 接口,这是授权体系的核心。FilterSecurityInterceptor 在鉴权时,就是通过调用 AccessDecisionManager 的 decide() 方法来进行授权决策,若能通过,则可访问对应的接口。
AccessDecisionManager 类的方法具体实现都在子类当中,包含 AffirmativeBased、ConsensusBased、UnanimousBased 三个子类;
AffirmativeBased 表示一票通过,这是 AccessDecisionManager 默认类;
ConsensusBased 表示少数服从多数;
UnanimousBased 表示一票反对;
如何理解这个投票机制呢?
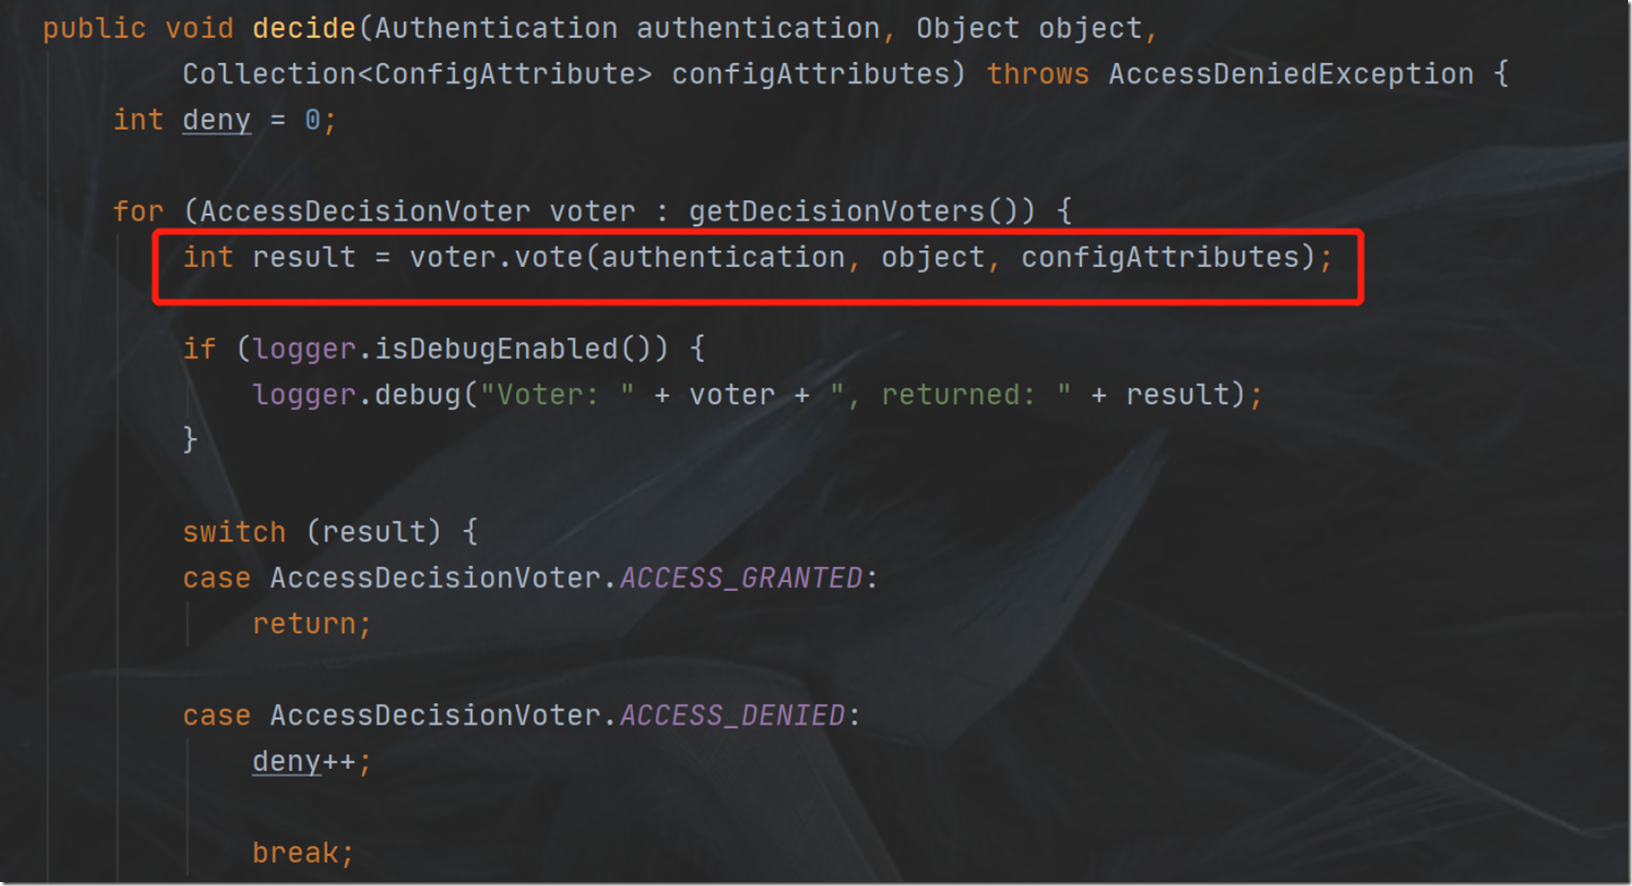
点进去 AffirmativeBased 类里,可以看到里面有一行代码 int result = voter.vote(authentication, object, configAttributes):
这里的 AccessDecisionVoter 是一个投票器,用到委托设计模式,即 AffirmativeBased 类会委托投票器进行选举,然后将选举结果返回赋值给 result,然后判断 result 结果值,若为 1,等于 ACCESS_GRANTED 值时,则表示可一票通过,也就是,允许访问该接口的权限。
这里,ACCESS_GRANTED 表示同意、ACCESS_DENIED 表示拒绝、ACCESS_ABSTAIN 表示弃权:
1 public interface AccessDecisionVoter<s> {
2 int ACCESS_GRANTED = 1;
3 int ACCESS_ABSTAIN = 0;
4 int ACCESS_DENIED = -1;
5 ......
6 }</s>
那么,什么情况下,投票结果 result 为 1 呢?
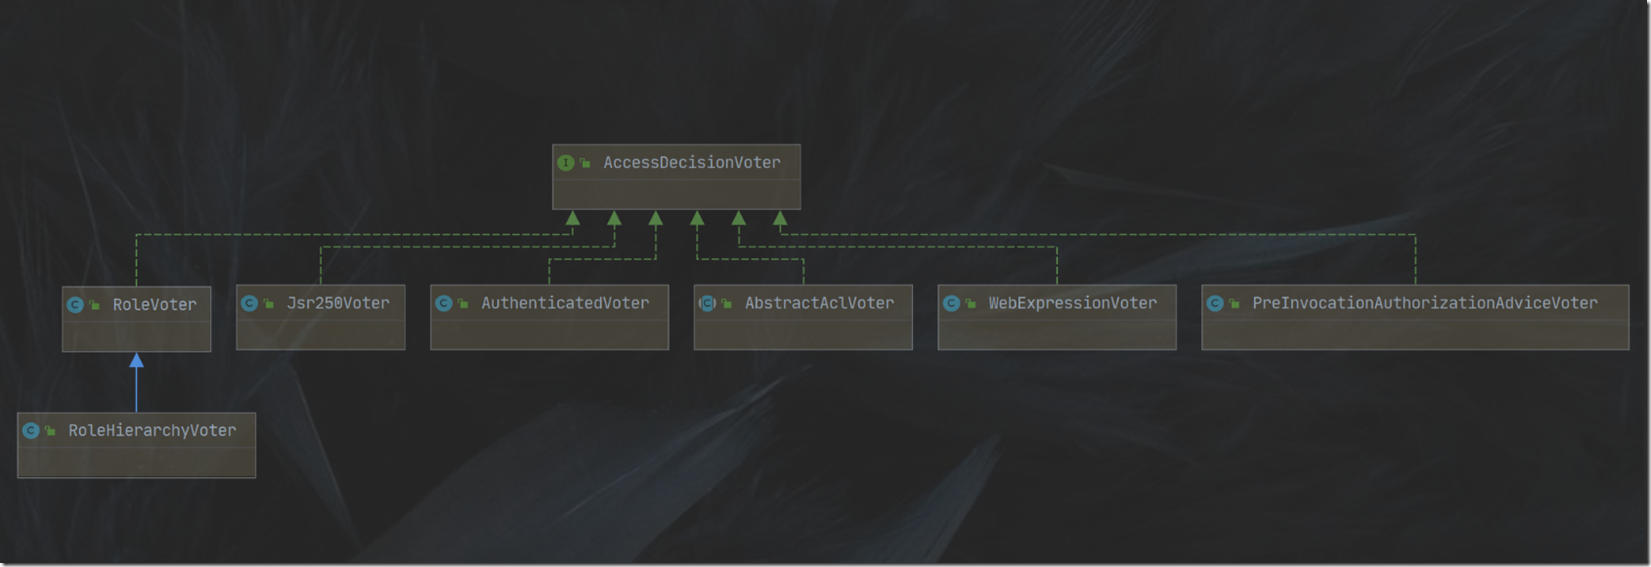
这里需要研究一下投票器接口 AccessDecisionVoter,该接口的实现如下图所示:
这里简单介绍两个常用的:
1. RoleVoter: 这是用来判断 url 请求是否具备接口需要的角色,这种主要用于使用注解 @Secured 处理的权限;
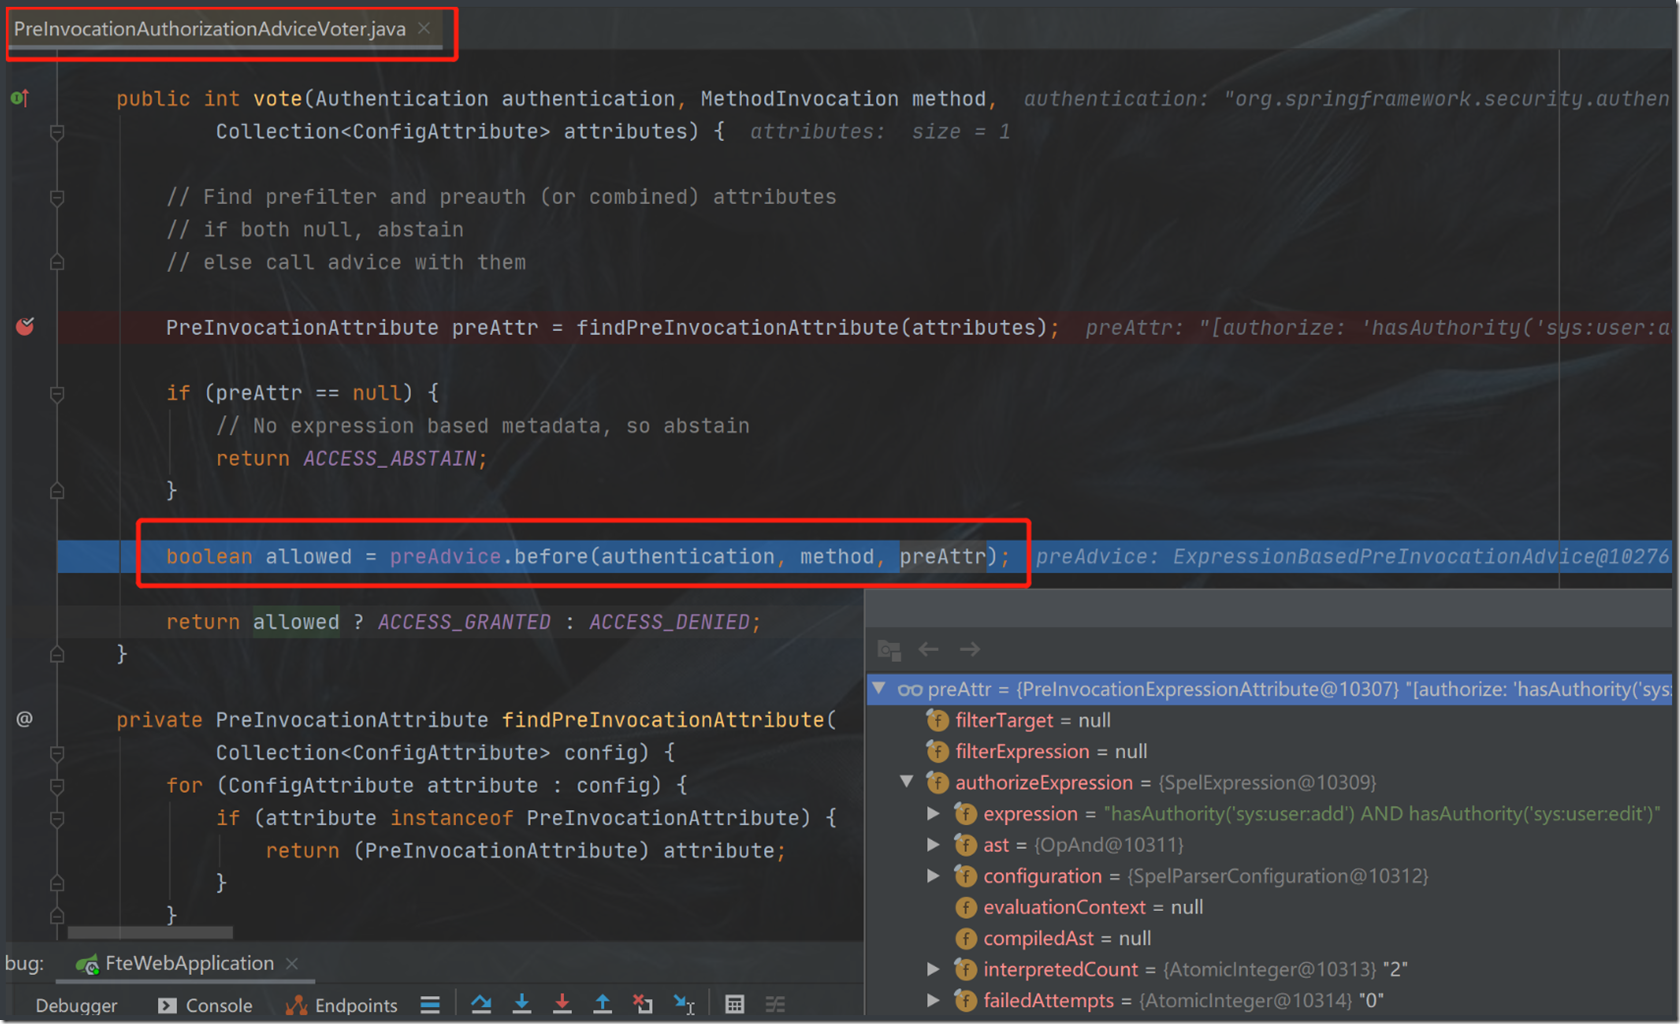
2. PreInvocationAuthorizationAdviceVoter:针对类似注解 @PreAuthorize("hasAuthority('sys:user:add') AND hasAuthority('sys:user:edit')") 处理的权限;
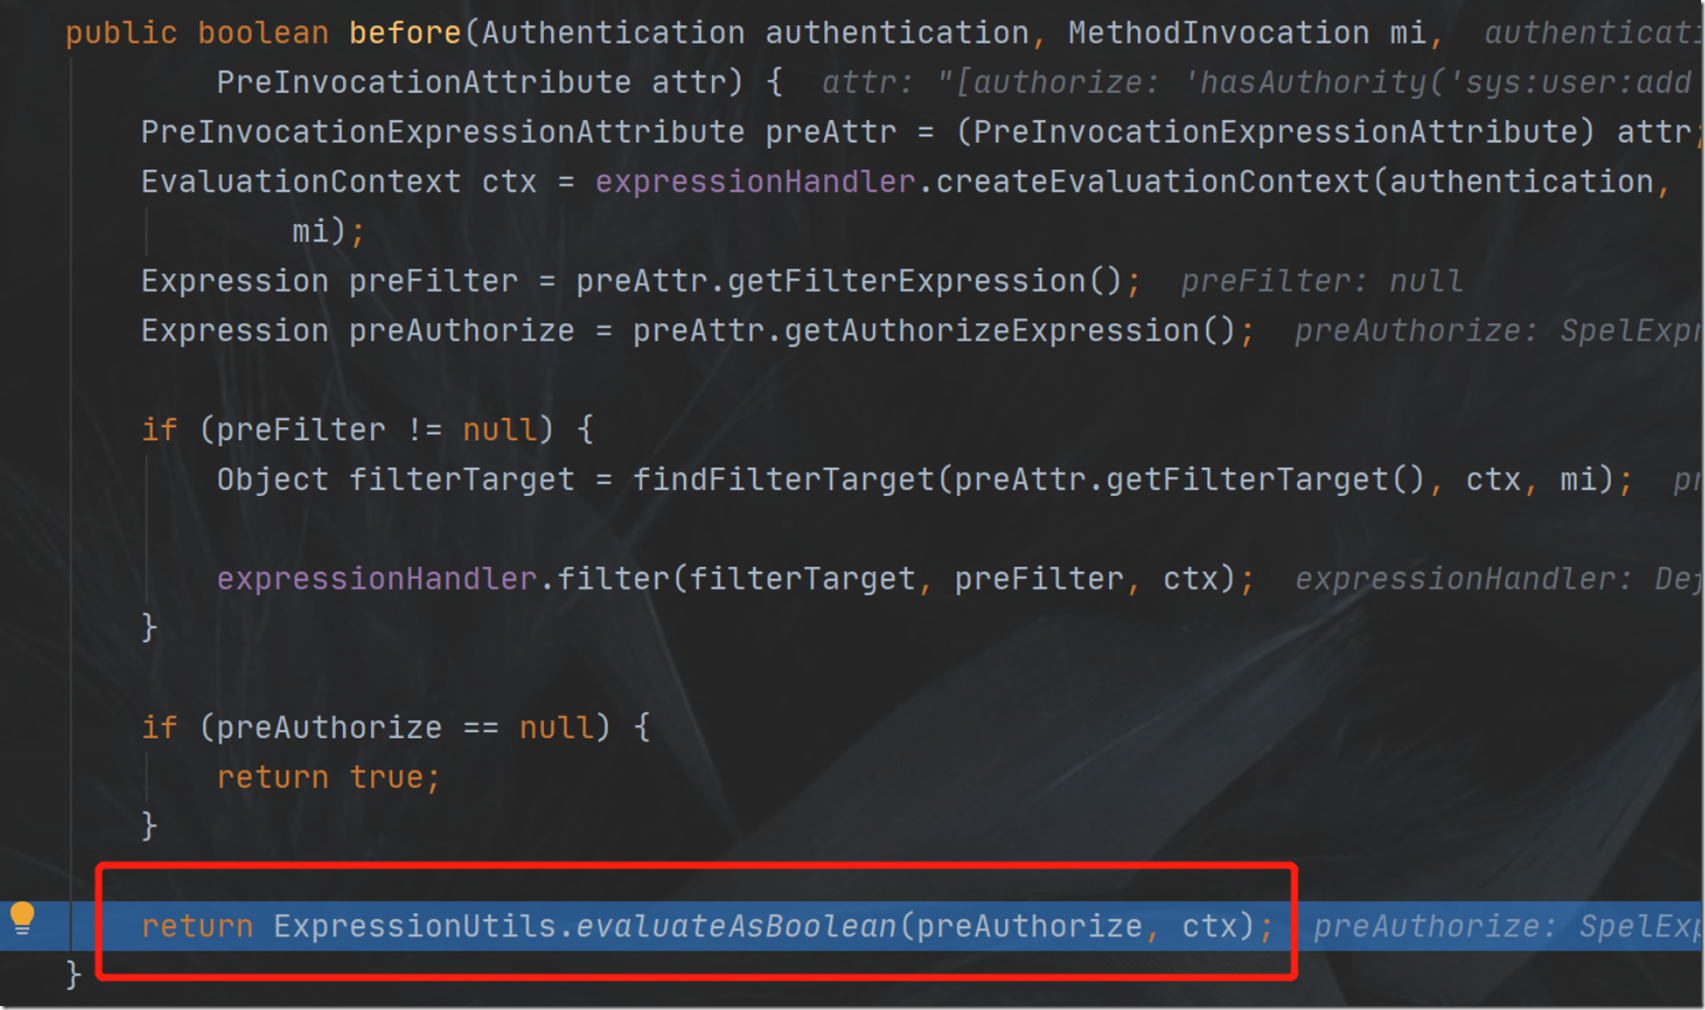
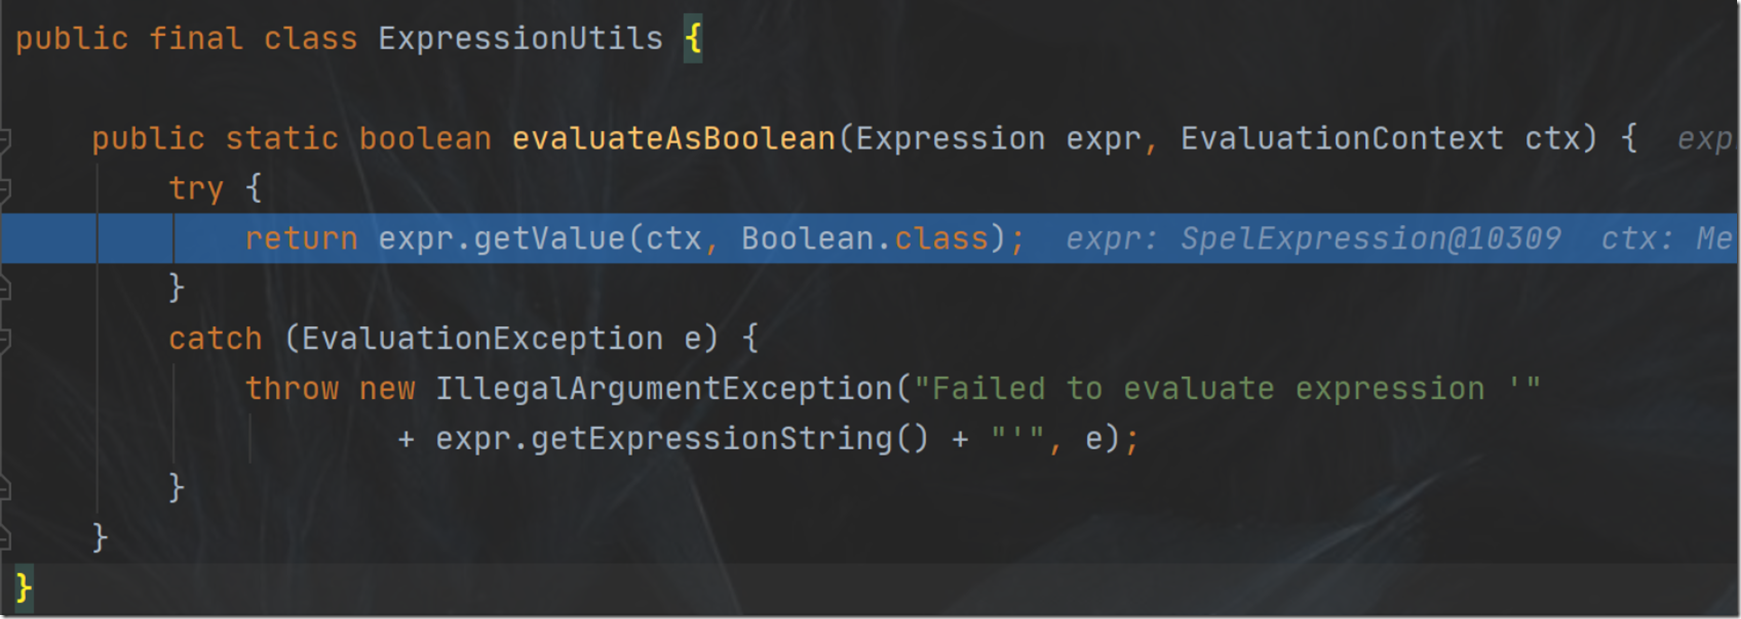
到这一步,代码就开始难懂了,这部分封装地过于复杂,总体的逻辑,是将用户信息所具有的权限与该接口的权限表达式做匹配,若能匹配成功,返回 true,在三目运算符中,
allowed ? ACCESS_GRANTED : ACCESS_DENIED,就会返回 ACCESS_GRANTED ,即表示通过,这样,返回给 result 的值就为 1 了。
到此为止,本文就结束了,笔者仍存在不足之处,欢迎各位读者能够给予珍贵的反馈,也算是对笔者写作的一种鼓励。